I've been teaching pastry classes for years, and I can't tell you how many students come in frustrated because their tart dough shrinks like a scared turtle or turns into a soggy cracker. The problem is almost never the recipe itself. It's the small, unspoken details that recipes assume you already know. Let's fix that.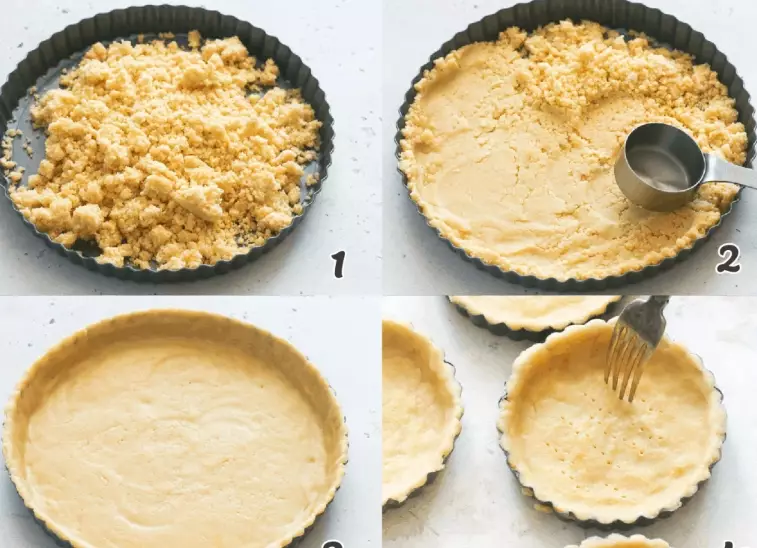
What's Inside (So You Can Jump Around)
Ingredients That Actually Matter
You'll find a hundred tart dough recipes online. They all list flour, butter, sugar, egg, and maybe water. But the brand of butter and the way you handle the flour matter more than the ratios. I use a European-style butter with at least 82% fat. The cheap stuff with 80% or less? Your crust will taste flat and the texture will be crumbly in a bad way.
Flour is another trap. Most all-purpose flour works fine, but if you're in a humid climate, your flour might already be holding extra moisture. Weigh it, don't scoop. A cup of flour can vary by 20 grams depending on how you fill it. That's the difference between a tender crust and a brick.
Here's a non-consensus tip: skip the ice water. Use cold vodka instead. The alcohol evaporates faster during baking, which means less gluten development and a flakier crust. I learned this from a French baker who swore by it. It sounds weird, but it works.
Step-by-Step Tart Dough Process
This is the part where most people go wrong. Not because they're clumsy, but because they rush. Let's walk through it.
Step 1: Cut the butter into the flour (the right size matters)
You want butter pieces the size of peas, but not all the same size. Aim for a mix: some pieces like small peas, some like coarse sand. This creates layers. If you cut the butter too fine, you get a mealy crust that crumbles. Too big, and you get holes in your dough.
Step 2: Add the liquid gradually
Start with 2 tablespoons of your cold liquid. Pulse or fork it in. Then add one tablespoon at a time until the dough just holds together when you squeeze a handful. It should look shaggy, not a smooth ball. Stop before it looks perfect. That's the moment you've overdone it.
Step 3: Form a disc and chill
Flatten the dough into a disc, wrap it in plastic, and refrigerate for at least 2 hours. Overnight is better. I know you want to bake now. Don't. The gluten needs time to relax, and the butter needs to re-firm. Skipping this step is the number one reason tart dough shrinks.
The Resting Phase: Why It's Non-Negotiable
I've tested this. I once tried to rush a tart dough for a dinner party and skipped the rest. The crust shrank by a full inch in the pan, and the sides slumped. It was embarrassing. The science is simple: gluten strands tighten when you work the dough, and cold rest relaxes them. Also, the flour needs time to absorb the liquid fully. If you roll out the dough too soon, it will be sticky and tear.
How long? Two hours minimum in the fridge. If you're in a hurry, 45 minutes in the freezer works, but the dough is stiffer and harder to roll. I always plan for overnight. The flavor also improves as the dough rests.
Roasting vs Baking: How to Avoid the Soggy Bottom
Many recipes tell you to blind-bake. That means lining the tart shell with parchment and weights, then baking. But here's the thing: if your filling is wet (like a fruit tart or custard), you need to go one step further. I brush the partially baked shell with a thin layer of egg white and return it to the oven for 2 minutes. This creates a seal. No more soggy bottom.
Also, roast your tart shell on the lowest oven rack. Most ovens run hot at the top, and the bottom needs the most direct heat to crisp. This is a detail I learned from a bakery owner in Lyon. It sounds small, but it changes everything.
Troubleshooting Common Tart Dough Failures
Here's a table I wish I had when I started. These are the real problems I see in my classes.
| Problem | Cause | Fix |
|---|---|---|
| Dough shrinks in the pan | Gluten not relaxed, dough too warm | Chill dough for at least 2 hours; handle quickly |
| Crust is tough and hard | Overworking the dough or too much water | Stop mixing when it just holds; use less liquid |
| Soggy bottom after filling | No seal; filling too wet | Brush with egg white and bake 2 min before filling |
| Crust crumbles when cutting | Too much butter or not enough resting | Use pea-sized butter bits; rest overnight |
A note on pans: Dark metal pans brown faster. If you use one, lower your oven temperature by 15°C (25°F). Glass pans are slower. I use a standard aluminum tart pan with a removable bottom. It's cheap and works.
FAQ: Quick Answers from a Pastry Chef
That's it. No magic, just details. The crust is the foundation of a great tart, and these steps make it reliable. I've verified each tip in my own kitchen and in classes. Go make one.

Leave a Comment