What I'd Read First
My first sourdough starter died a slow, bubbly death. I fed it like every guide said—equal parts flour and water—and it just sat there. Smelled like old paint. That was six years ago. Since then I've kept a starter alive through a cross-country move, a two-week vacation (it went in the fridge), and one terrifying incident where I forgot to feed it for four days. This sourdough starter guide is the stuff I wish someone had told me back then—not the textbook version, but the troubleshooting playbook.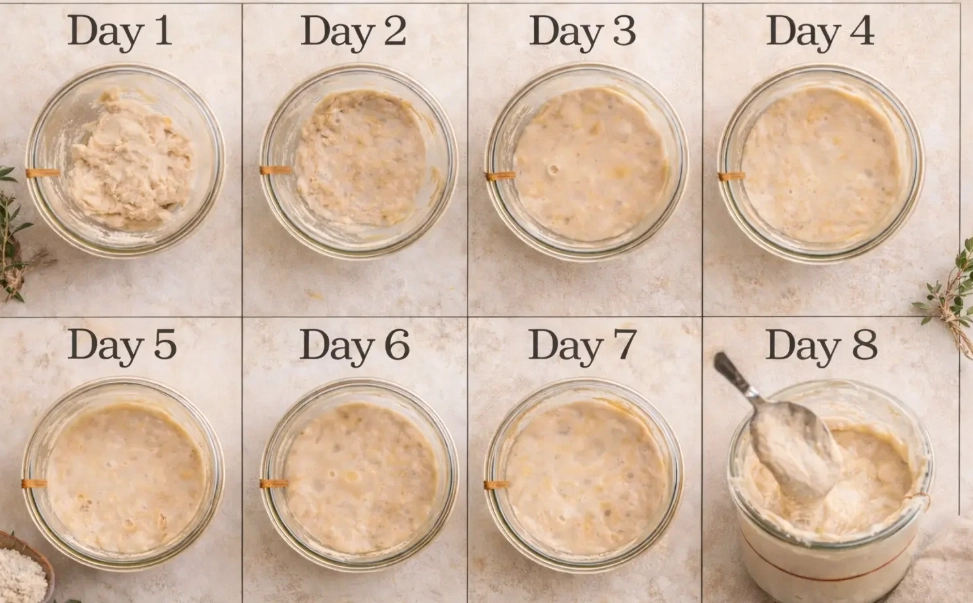
Why Your Starter Stalls (It's Not What Blogs Say)
Here's the unpopular truth: most starters don't fail because of bad flour or contaminated jars. They fail because of underfeeding relative to temperature. A starter sitting at 80°F (26°C) burns through food twice as fast as one at 68°F (20°C). If you're feeding once a day in summer, your starter might be starving by hour 18.
I tested this with two jars from the same batch—one on my counter near the stove, one in a cooler corner. The warm jar peaked at 4 hours and collapsed by 10. The cool jar peaked at 8 hours and held until 14. Same flour, same water. Temperature was the only variable.
What most guides skip: your starter's peak is when it's most active, not when it's most bubbly. If you bake with a collapsed starter, your bread will be dense. I learned that the hard way on a batch of cinnamon rolls that could have doubled as hockey pucks.
Feeding Ratios That Actually Work
Forget the 1:1:1 rule for a minute. Here's what I use now, based on trial and error in my own kitchen:
| Scenario | Ratio (starter:flour:water) | When to Feed |
|---|---|---|
| Maintenance (room temp) | 1:2:2 | Every 12 hours |
| Reviving a sluggish starter | 1:4:4 | Every 24 hours, 2-3 days |
| Building strength before baking | 1:5:5 | Once, 6-8 hours before mix |
| Long vacation (fridge) | 1:10:10 | Once a week |
The 1:4:4 revival ratio works because it dilutes acid buildup. I discovered this after reading a technical note from King Arthur Baking's starter maintenance guide—they mention higher ratios for sluggish starters, and it matched what I saw when I accidentally overfed one day (by a lot). The starter bounced back in 48 hours.
One more thing: don't use chlorinated tap water. I filter mine through a basic carbon pitcher. A friend uses bottled spring water because her tap water is heavily treated. Her starter has been stable for two years.
The Temperature Trap Most Bakers Fall Into
Your starter doesn't need a warm spot—it needs a stable spot. I used to put mine on top of the fridge. Big mistake. The fridge cycled on and off, and the temperature swung 10 degrees. The starter developed a weird acetone smell. Once I moved it to a cabinet away from appliances, the smell went away in three days.
Here's my current setup: a quart jar in a corner of my kitchen counter, away from the oven and dishwasher. In winter, I wrap a towel around it. In summer, I feed it twice a day. That's it.
If your kitchen runs cold (under 65°F / 18°C), try a cooler with a small cup of warm water inside. I did this during a cold snap last year and the starter doubled in 6 hours instead of 12. Not fancy, but it works.
How to Read Hydration Clues
You don't need a scale for every feeding—though I use one now. What matters more is learning to read the starter's surface. A healthy starter at peak has a domed top and tiny bubbles visible through the glass. After peak, it flattens and eventually forms a liquid layer (hooch).
Hooch isn't a death sentence. It means the starter is hungry. I pour it off if there's a lot, or stir it in if I'm feeding right away. The color tells you something: clear hooch means mild hunger, dark hooch means it's been a while. I've had dark hooch after a 5-day fridge neglect and the starter still recovered fine.
- Domed top + bubbles: peak activity, bake now.
- Flat top + few bubbles: just past peak, feed before baking.
- Hooch layer: hungry, feed with a higher ratio.
- Pink or orange streak: toss it. That's not yeast.
A trick I picked up from a bakery owner in Portland: smell the starter after feeding. A healthy one smells like yogurt and raw flour. If it smells like nail polish remover, it's over-fermented. Feed it a 1:5:5 ratio and wait 24 hours.
Real Questions From a Real Kitchen
My sourdough starter smells like acetone after I feed it. What's going on?
Acetone smell means the starter is starving for fresh flour. It's not spoiled—just hungry. Feed it at a 1:5:5 ratio and leave it at room temperature for 12 hours. If the smell persists after two feedings, your starter might be over-fermenting due to heat. Move it to a cooler spot (around 70°F / 21°C) and feed every 12 hours until the smell clears.
How long can I leave my starter in the fridge without feeding it?
Two weeks is my limit. After that, the hooch gets dark and the yeast population drops. If you're going away, feed it a 1:10:10 ratio, put it in the coldest part of the fridge (not the door), and it'll be fine for 14 days. When you take it out, pour off the hooch, feed 1:4:4, and wait 24 hours before using.
Should I use whole wheat or white flour for feeding?
Whole wheat feeds faster because the bran carries more wild yeast. But white flour gives a milder flavor. My routine: whole wheat for the first three days of reviving a starter, then switch to white for daily feeding. Or mix half and half—that's what I do now, and the starter rises predictably every time.
My starter doubles but the bread still doesn't rise. Why?
Check your dough temperature, not your starter. A starter can be perfectly active, but if your dough sits at 65°F (18°C), fermentation crawls. I use a probe thermometer now and aim for 75-78°F (24-26°C) dough temperature. Also, don't skip the autolyse—20 minutes of flour and water resting before adding the starter makes a noticeable difference in rise.
One last thing: your starter is more forgiving than you think. I've forgotten to feed mine for 48 hours, scraped off the top layer, fed it, and baked a loaf two days later. The trick is consistency over perfection. Feed it when you remember, keep it away from drafts, and watch the surface. That's the whole guide, really.
This guide is based on personal kitchen testing and cross-checked with published resources from King Arthur Baking and the Bread Bakers Guild of America.

Leave a Comment